Data Binding 实践

Data Binding Library

去年的Google IO 大会上,Android 团队发布了一个数据绑定框架(Data Binding Library)。以后可以直接在 layout 布局 xml 文件中绑定数据了,无需再 findViewById 然后手工设置数据了。其语法和使用方式和 JSP 中的 EL 表达式非常类似。由于那时还只是测试版,而且
Android Studio还没有很好的支持,就没有怎么实践,前段时间Android Studio发布了2.0正式版,而且已经内置了该框架的支持,配置起来也很简单

配置

在主目录的build.gradle中如下配置即可

1
2
3
4
5
6
android {
....
dataBinding {
enabled = true
}
}

Layout文件跟之前有很大的不同,我们先看看原来的布局文件 activity_main.xml

1
2
3
4
5
6
7
8
9
10
11
12
13
14
15
16
17
18
19
20
21
22
23
24
25
26
27
28
29
30
31
32
33
34
35
36
37
38
39
40
41
42
43
44
45
46
47
48
49
50
51
52
53
54
<?xml version="1.0" encoding="utf-8"?>
<LinearLayout
xmlns:android="http://schemas.android.com/apk/res/android"
xmlns:app="http://schemas.android.com/apk/res-auto"
xmlns:tools="http://schemas.android.com/tools"
android:layout_width="match_parent"
android:layout_height="match_parent"
android:fitsSystemWindows="true"
android:orientation="vertical"
tools:context="me.loody.databindingdemo.MainActivity">
<android.support.design.widget.AppBarLayout
android:layout_width="match_parent"
android:layout_height="wrap_content"
android:theme="@style/AppTheme.AppBarOverlay">
<android.support.v7.widget.Toolbar
android:id="@+id/toolbar"
android:layout_width="match_parent"
android:layout_height="?attr/actionBarSize"
android:background="?attr/colorPrimary"
app:popupTheme="@style/AppTheme.PopupOverlay"/>
</android.support.design.widget.AppBarLayout>
<LinearLayout
android:layout_width="match_parent"
android:layout_height="match_parent"
android:orientation="vertical">
<TextView
android:layout_width="wrap_content"
android:layout_height="wrap_content"
android:textColor="@color/colorPrimaryDark"
android:textSize="18dp"
tools:text="name"/>
<TextView
android:layout_width="wrap_content"
android:layout_height="wrap_content"
android:textColor="@color/colorPrimaryDark"
android:textSize="18dp"
tools:text="age"/>
<Button
android:layout_width="match_parent"
android:layout_height="wrap_content"
android:gravity="center"
android:onClick="onClickButton"
android:text="jump"
android:textColor="@color/colorPrimaryDark"
android:textSize="18dp"/>
</LinearLayout>
</LinearLayout>

下面是Data Binding的 activity_main.xml

1
2
3
4
5
6
7
8
9
10
11
12
13
14
15
16
17
18
19
20
21
22
23
24
25
26
27
28
29
30
31
32
33
34
35
36
37
38
39
40
41
42
43
44
45
46
47
48
49
50
51
52
53
54
55
56
57
58
59
60
61
62
63
64
65
66
67
68
69
<?xml version="1.0" encoding="utf-8"?>
<layout xmlns:android="http://schemas.android.com/apk/res/android"
xmlns:app="http://schemas.android.com/apk/res-auto"
xmlns:bind="http://schemas.android.com/apk/res-auto"
xmlns:tools="http://schemas.android.com/tools">
<data>
<import type="me.loody.databindingdemo.User"/>
<variable
name="user"
type="User"/>
</data>
<LinearLayout
android:layout_width="match_parent"
android:layout_height="match_parent"
android:fitsSystemWindows="true"
android:orientation="vertical"
tools:context="me.loody.databindingdemo.MainActivity">
<android.support.design.widget.AppBarLayout
android:layout_width="match_parent"
android:layout_height="wrap_content"
android:theme="@style/AppTheme.AppBarOverlay">
<android.support.v7.widget.Toolbar
android:id="@+id/toolbar"
android:layout_width="match_parent"
android:layout_height="?attr/actionBarSize"
android:background="?attr/colorPrimary"
app:popupTheme="@style/AppTheme.PopupOverlay"/>
</android.support.design.widget.AppBarLayout>
<LinearLayout
android:layout_width="match_parent"
android:layout_height="match_parent"
android:orientation="vertical">
<TextView
android:layout_width="wrap_content"
android:layout_height="wrap_content"
android:text="@{user.name)}"
android:textColor="@color/colorPrimaryDark"
android:textSize="18dp"
tools:text="test"/>
<TextView
android:layout_width="wrap_content"
android:layout_height="wrap_content"
android:text="@{String.valueOf(user.age)}"
android:textColor="@color/colorPrimaryDark"
android:textSize="18dp"
tools:text="test"/>
<Button
android:layout_width="match_parent"
android:layout_height="wrap_content"
android:gravity="center"
android:onClick="onClickButton"
android:text="jump"
android:textColor="@color/colorPrimaryDark"
android:textSize="18dp"/>
</LinearLayout>
</LinearLayout>
</layout>

我们看到Data Binding layout文件有点不同的是:起始根标签是layout,接下来一个data元素以及一个view的根元素。这个view元素就是你没有使用Data Binding的layout文件的根元素.

我们定义的一个User

1
2
3
4
5
6
7
8
9
public class User {
public final String name;
public final int age;
public User(String name, int age) {
this.name = name;
this.age = age;
}
}

Binding数据

在MainActivity中添加如下代码

1
2
3
ActivityMainBinding activityMainBinding = DataBindingUtil.setContentView(this, R.layout.activity_main);
User user = new User("loody", 27);
activityMainBinding.setUser(user);

这里的ActivityMainBinding是根据布局文件activity_main的名称生成的。布局文件和绑定的数据一定要写对,否则无法生成Binging文件

这样我们程序就可以将User的信息显示出来了,如下图:

其中布局文件还有还有两个节点

import:等价于java文件中的import导包

variable:申明变量 每一个variable元素描述了一个用于layout文件中Binding表达式的属性。

同样Data Binding的layout也是支持include、ViewStub的,具体使用方法在这里不多说

Observable Binding

通过Data Binding,我们已经把对象的属性绑定到UI上了,有的时候,代码会修改我们绑定的对象的某些属性,那么怎么通知界面刷新呢?这就要用到Observable Binding了,它有两种方式

  1. 让你的绑定数据类继承BaseObservable,然后通过调用notifyPropertyChanged方法来通知界面属性改变,如下:
1
2
3
4
5
6
7
8
9
10
11
12
13
14
15
16
17
18
19
20
21
22
23
24
25
26
27
28
29
public class ObservableUser extends BaseObservable {
public String name;
public int age;
public ObservableUser(String name, int age) {
this.name = name;
this.age = age;
}
@Bindable
public String getName() {
return name;
}
@Bindable
public int getAge() {
return age;
}
public void setName(String name) {
this.name = name;
notifyPropertyChanged(me.loody.databindingdemo.BR.name);
}
public void setAge(int age) {
this.age = age;
notifyPropertyChanged(me.loody.databindingdemo.BR.age);
}
}
在需要通知的属性的get方法上加上@Bindable,这样编译阶段会生成BR.[property name],然后使用这个调用方法notifyPropertyChanged就可以通知界面刷新了
  1. Data Binding Library提供了很便利的类ObservableField,还有ObservableBoolean, ObservableByte, ObservableChar, ObservableShort, ObservableInt, ObservableLong, ObservableFloat, ObservableDouble, 和 ObservableParcelable,基本上涵盖了各种我们需要的类型
1
2
3
4
public class PlainUser {
public final ObservableField<String> name = new ObservableField<>();
public final ObservableInt age = new ObservableInt();
}

然后使用下面的代码来访问:

user.name.set("loody");
user.age.set(18); 

调用set方法时,Data Binding Library就会自动的帮我们通知界面刷新了。

MVVM

以上就是关于Data Binding的一些基础实践,并没有多么复杂,关键是它要传达的一种思想即View的变化可以自动的反应在ViewModel,ViewModel的数据变化也会自动反应到View上,这种思想也就是我们常常提到的 MVVM 设计模式,最后借用一张图来介绍下MVVM
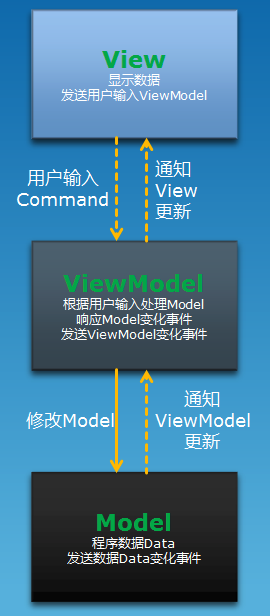
mvvm

参考

https://developer.android.com/intl/zh-cn/tools/data-binding/guide.html
Data Binding(数据绑定)用户指南
http://gold.xitu.io/entry/56781baf00b01b78ac54c10a